Showing posts with label free pattern. Show all posts

Thursday, April 22, 2010

Gnome Babies!


Friendship Gnome Babies!


I made a new pattern for these little Gnome Babies! I've given them to a few friends. I think they're kind of cute/ugly (if that makes sense!!). I'm working on getting a pattern tutorial up for my blog! Stay tuned!!

Edited! Here is the new Pattern Tutorial! Friendship Babies Pattern and Tutorial

Monday, April 19, 2010

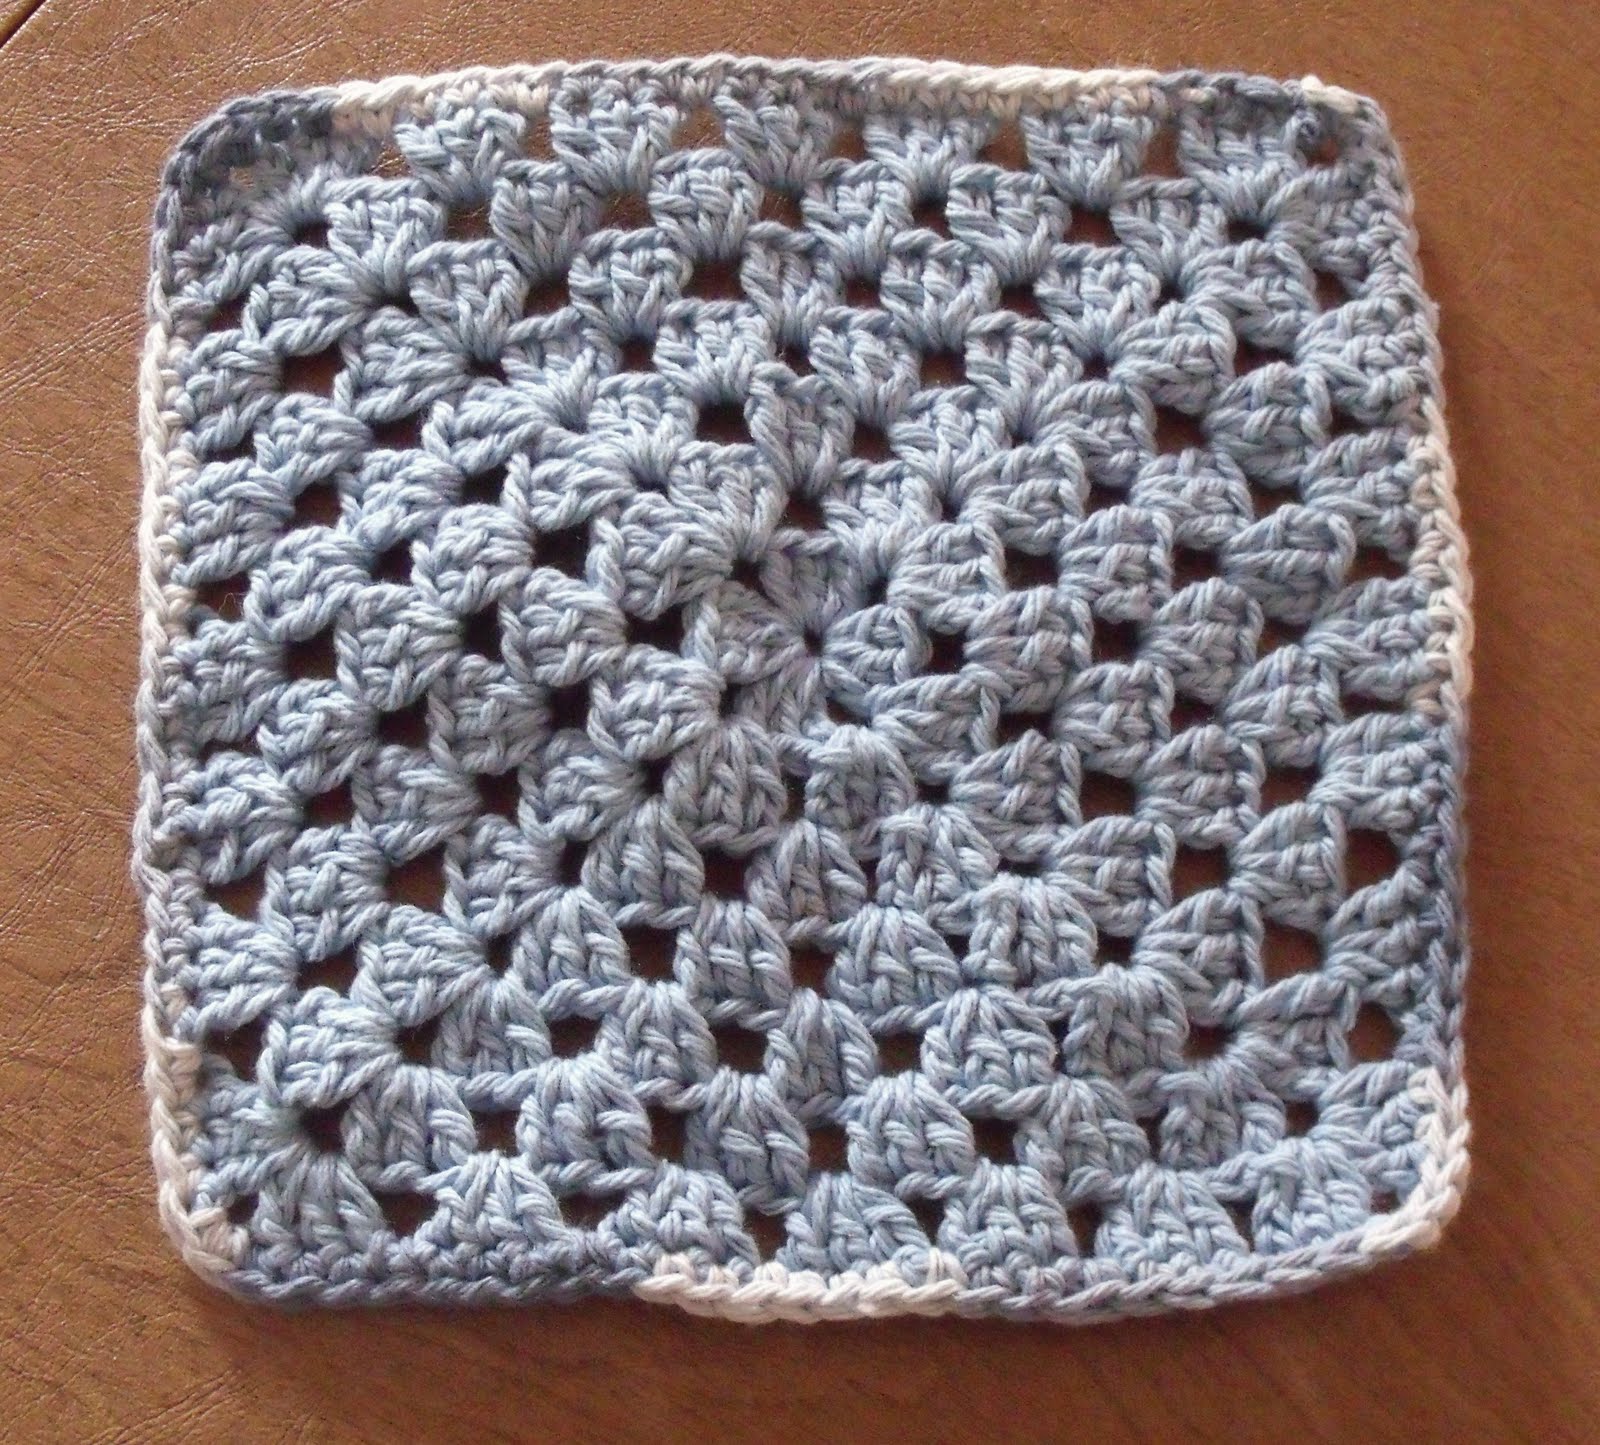
Crochet Granny Squares Dishcloth Free Pattern

I know I promised this pattern a few weeks ago, but life has a way of getting hectic. I've been trying to get my garden dug up and planted! Nevertheless...here it is! Any questions or corrections (I might have missed!) please feel free to comment!
My Favorite Granny Square Dishcloth Pattern


Pattern Abbreviations:
ch = chain
dc = double crochet (US version)
sp = space
sl st = slip stitch


Materials needed:
Worsted weight cotton yarn
Size G or H hook

Difficulty Level: Easy
Approximate finished size: 9 " although this might vary depending on how tight/loose you crochet.


Helpful Hint:


The majority of your crocheting will be done in either the "Chain 1 space" indicated by the arrows or the "Corner ch 2 space" also noted in the picture. The "Ch 1 space" are around each side of the piece. The "Corner - ch 2 space" will obviously be in one of the four corners.


Directions:

Row 1: Chain 4 (work all of the next stitches in the 4th ch from hook) 2 dc, * ch 1, 3 dc, repeat from * twice more, ch 1. Join with sl st to top of beginning ch 4.


Row 2: Ch 3; in same space as your ch 3-(2 dc, ch 2, 3 dc); (see photo) *(3 dc, ch 2, 3 dc) in next ch 1 sp. (see 2nd photo) Repeat from * two more times. Join with sl st to top of beg ch 3. Sl stitch 2 more spaces until you get to ch 2 corner space.


[Work beginning of your row 2 in same space as your beg. ch 3]

[This round will create your "corners" of your square.]


[Slip stitch 2 sp until you get to ch 2 corner space. (see photos)]


Row 3: Ch 3; In same sp as your ch 3- (2 dc in the corner, ch 2, 3 dc); ch 1; (3 dc in next ch 1 space) (ch 1=open space-see photo); ch 1; (3 dc, ch 2, 3 dc in next corner space) 3 times; ch 1; 3 dc in next ch 1 space; join with beginning ch 3; slip st to corner.


[Next ch 1 space]


Row 4: Ch 3; (2 dc, ch 2, 3 dc) in corner ch 2 sp; ch 1; * [3 dc in next ch 1 sp, ch 1] 2 times; (3 dc, ch 2, 3 dc), ch 1; ** repeat from * to ** 3 times; [3 dc in next ch 1 sp, ch 1] 2 times; slip st to corner.


Row 5: Ch 3; (2 dc, ch 2, 3 dc) in corner ch 2 sp; ch 1; * [3 dc in next ch 1 sp, ch 1] 3 times; (3 dc, ch 2, 3 dc), ch 1; ** repeat from * to ** 3 times; [3 dc in ch 1 sp, ch 1] 3 times; sl st to corner.


Row 6: Ch 3; (2 dc, ch 2, 3 dc) in corner ch 2 sp; ch 1; * [3 dc in next ch 1 sp, ch 1] 4 times; (3 dc, ch 2, 3 dc), ch 1; ** repeat from * to ** 3 times; [3 dc in ch 1 sp, ch 1] 4 times; sl st to corner.


Row 7: Ch 3; (2 dc, ch 2, 3 dc) in corner ch 2 sp; ch 1; * [3 dc in next ch 1 sp, ch 1] 5 times; (3 dc, ch 2, 3 dc), ch 1: ** repeat from * to ** 3 times; [3 dc in ch 1 sp, ch 1] 5 times; sl st to corner.


Row 8: Ch 3; (2 dc, ch 2, 3 dc) in corner ch 2 sp; ch 1; * [3 dc in nxt ch 1 sp, ch 1] 6 times; (3 dc, ch 2, 3 dc), ch 1; ** repeat from * to ** 3 times; [3 dc in ch 1 sp, ch 1] 6 times; sl st to corner.


Row 9: Ch 3; (2 dc, ch 2, 3 dc) in corner ch 2 sp; ch 1; * [3 dc in nxt ch 1 sp, ch 1] 7 times; (3 dc, ch 2, 3 dc), ch 1; ** repeat from * to ** 3 times; [3 dc in ch 1 sp, ch 1] 7 times; sl st to corner.


Row 10: Sc in each stitch around. 2 sc in corners.


Tie off. Weave in ends.


Hope you enjoy crocheting this! If you find any errors, don't forget to let me know! Thanks!



Wednesday, April 7, 2010

Friendship Gnome Babies! ~A Free Pattern Tutorial~

I am so excited to bring you my new Friendship Gnome Babies Pattern and Tutorial!!


~Friendship Gnome Baby~


Materials needed to make one Gnome Baby:


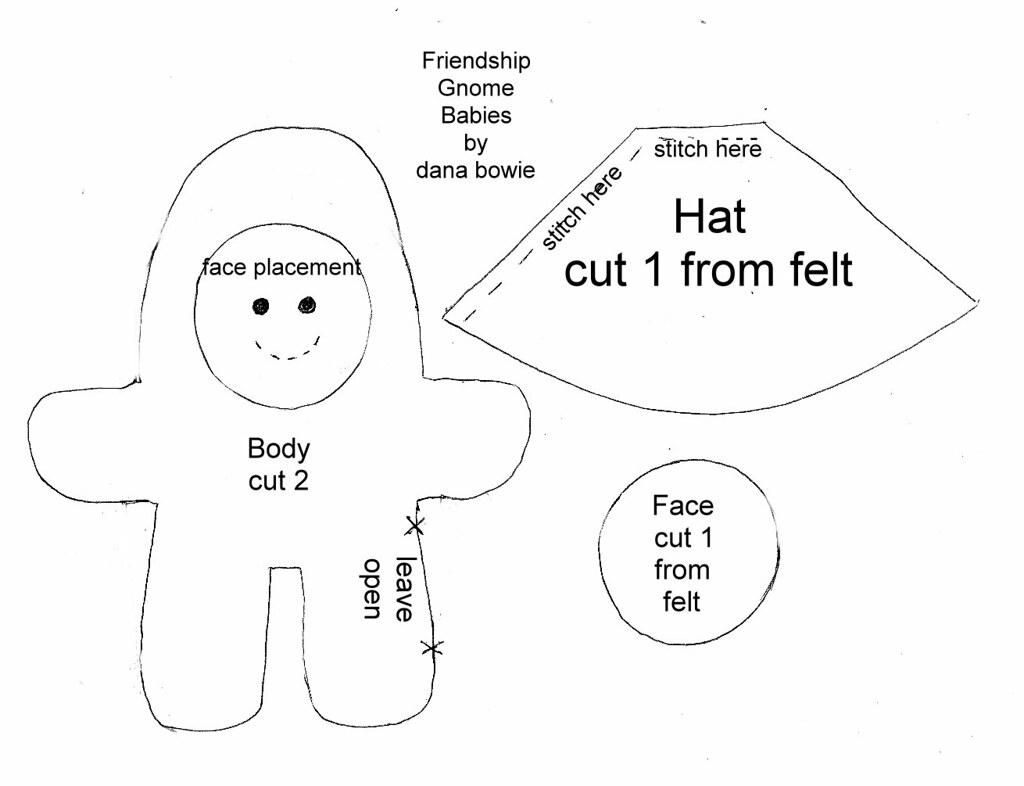
Click above image for the pattern.
Printing help: to get my pattern to print to the correct size, I chose "Landscape Layout", then printed at 80%.

2 pcs. fabric (your choice) 5 1/2" x 7" [13.97 cm x 17.178 cm] (for gnome baby) you can even use felt for these if you prefer!

1 pc coordinating felt: 4 1/2" x 6" [11.43 cm x 15.24 cm] - for hat

1 pc flesh or coordinating colored felt: 2 1/2" x 2 1/2" [6.35 x 6.35] (for face)

1 pair safety eyes, buttons, or you can use embroidery thread to sew your eyes

Basic sewing supplies

Embellishments (ribbon, beads, lace, etc)

Sm amount of polyfill stuffing

Sm pc of ribbon for hanging

Finished size: Approx. 5" [12.7 cm] from tip of hat to feet.

Directions:


Cut out all pattern pieces. Place fabric (for gnome baby) right sides together and pin. Draw around pattern. Mark where to leave open. This will be where you turn the piece inside out after sewing together.


Cut around pattern piece. Don't cut on the line, as this will be your sewing line.


Pin face pattern to flesh felt square. Pin hat pattern to hat felt piece. Draw around pattern and cut out this time ON the line.


Pin face to one of the body fabric pieces.


Stitch face to body using straight stitch, zig zag stitch or hand sew in place.


Next, if using safety eyes, using an awl, or something sharp, poke a tiny hole in the face where you want your eyes to be. Insert eyes, following package directions. If sewing eyes, you can either sew them now, or wait until you have the body sewn together.


Pin the two body pieces back together.


Machine stitch around the body leaving open where indicated. This can be a tiny bit tricky with the eyes. Just watch out for the posts. Or, if you prefer, you can hand stitch the body together. Carefully clip the curved edges.


Set the body aside for a moment. Next you will sew the hat. I like to make a decorative stitching around the bottom edge of the hat. It looks nice and my new machine does really cool stitches! Then, fold the hat in half and stitch the two along the side and around the top (see pattern).


Turn hat right side out.


Now turn your gnome babies body inside out, using a dowel rod or a blunt tool. Make sure you get the arms and legs turned inside out too. Stuff your gnome baby with polyfill stuffing, using small amounts at a time. Be sure to get plenty of stuffing in the arms and legs.


Next, using the pattern as a guide, finish stitching the gnome babies face. I like doing this before I stitch the body opening shut, so that I can hide my embroidery thread up inside the body. When satisfied with the face, you can then stitch the body closed using a hidden stitch or whipstitch.


(Embroider your babies face. You can even add freckles!)


Next place the hat on your baby, and sew on. I use a running stitch going inside under the hat.


Sew a piece of ribbon to the back of your baby for hanging.


Lastly, you can decorate your baby however you wish. Add ribbon around the waist, beads, lace, embroidery, etc.


Please let me know if you find any errors in this pattern!


Please respect artist's rights and do not sell this pattern or gnome babies made from this pattern. But feel free to make as many as you want for personal use!!