I am so excited to bring you my new Friendship Gnome Babies Pattern and Tutorial!!
~Friendship Gnome Baby~

Materials needed to make one Gnome Baby:
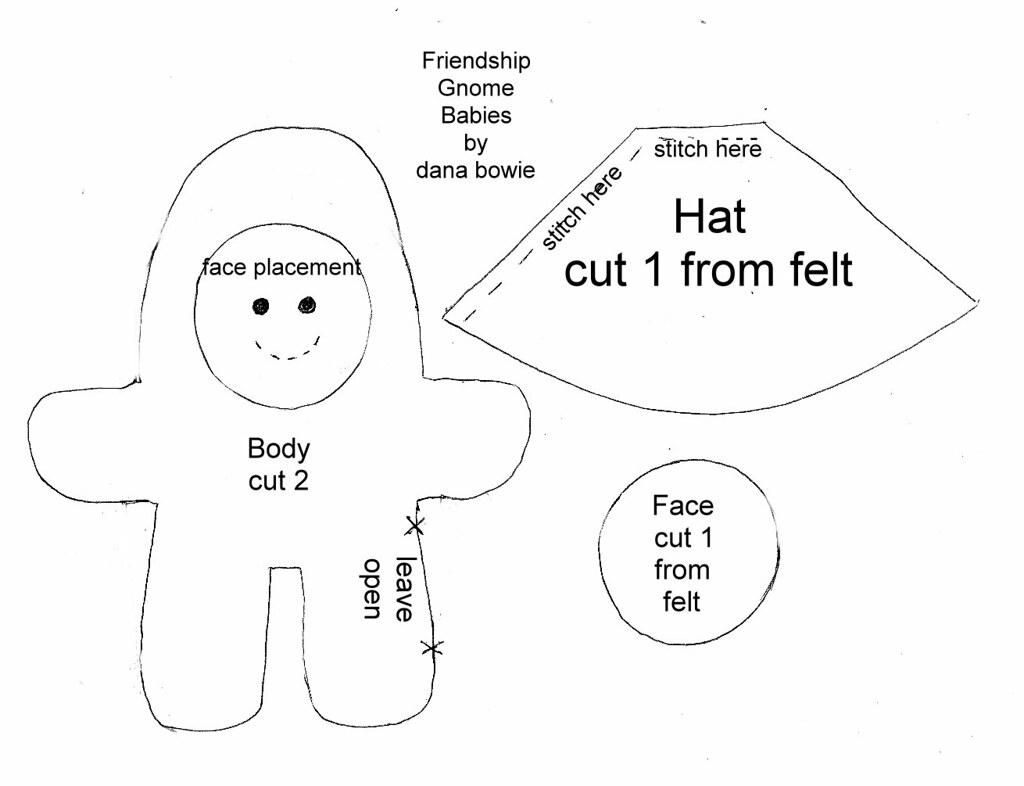
Click above image for the pattern.
Printing help: to get my pattern to print to the correct size, I chose "Landscape Layout", then printed at 80%.
2 pcs. fabric (your choice) 5 1/2" x 7" [13.97 cm x 17.178 cm] (for gnome baby) you can even use felt for these if you prefer!
1 pc coordinating felt: 4 1/2" x 6" [11.43 cm x 15.24 cm] - for hat
1 pc flesh or coordinating colored felt: 2 1/2" x 2 1/2" [6.35 x 6.35] (for face)
1 pair safety eyes, buttons, or you can use embroidery thread to sew your eyes
Basic sewing supplies
Embellishments (ribbon, beads, lace, etc)
Sm amount of polyfill stuffing
Sm pc of ribbon for hanging
Finished size: Approx. 5" [12.7 cm] from tip of hat to feet.
Directions:
Cut out all pattern pieces. Place fabric (for gnome baby) right sides together and pin. Draw around pattern. Mark where to leave open. This will be where you turn the piece inside out after sewing together.

Cut around pattern piece. Don't cut on the line, as this will be your sewing line.

Pin face pattern to flesh felt square. Pin hat pattern to hat felt piece. Draw around pattern and cut out this time ON the line.

Pin face to one of the body fabric pieces.

Stitch face to body using straight stitch, zig zag stitch or hand sew in place.

Next, if using safety eyes, using an awl, or something sharp, poke a tiny hole in the face where you want your eyes to be. Insert eyes, following package directions. If sewing eyes, you can either sew them now, or wait until you have the body sewn together.

Pin the two body pieces back together.

Machine stitch around the body leaving open where indicated. This can be a tiny bit tricky with the eyes. Just watch out for the posts. Or, if you prefer, you can hand stitch the body together. Carefully clip the curved edges.

Set the body aside for a moment. Next you will sew the hat. I like to make a decorative stitching around the bottom edge of the hat. It looks nice and my new machine does really cool stitches! Then, fold the hat in half and stitch the two along the side and around the top (see pattern).

Turn hat right side out.

Now turn your gnome babies body inside out, using a dowel rod or a blunt tool. Make sure you get the arms and legs turned inside out too. Stuff your gnome baby with polyfill stuffing, using small amounts at a time. Be sure to get plenty of stuffing in the arms and legs.
Next, using the pattern as a guide, finish stitching the gnome babies face. I like doing this before I stitch the body opening shut, so that I can hide my embroidery thread up inside the body. When satisfied with the face, you can then stitch the body closed using a hidden stitch or whipstitch.

(Embroider your babies face. You can even add freckles!)
Next place the hat on your baby, and sew on. I use a running stitch going inside under the hat.


Lastly, you can decorate your baby however you wish. Add ribbon around the waist, beads, lace, embroidery, etc.


Please let me know if you find any errors in this pattern!
Please respect artist's rights and do not sell this pattern or gnome babies made from this pattern. But feel free to make as many as you want for personal use!!
I love these, have now made 3 not sure how I will part with them! LOL. Adorable.
ReplyDelete